
This guide will show you how to replace a 2003-2012 Chevy Colorado front wheel bearing. In the process we will also cover replacing your brakes and repairing your differential seal if it is leaking as 99% of the work will already be done.
How do you know if your front wheel bearing has gone bad in your 2003-2012 Chevy Colorado and needs replacement? Well, you may find that you have some or all of the following symptoms:
- Mild vibration in your driver side pedal
- Scalloping on your front tires as seen in the 2 photos below
- Play in your tire when you lift the vehicle and pull on the tire at 12 and 6 o’clock (as seen in the video below)
- A humming noise when driving


Not all the above symptoms need to be present, but if your wheel bearing is bad, at least one of these symptoms will be evident. For help on diagnosing if your wheel bearing is bad, you can refer to the video we created below:
Before getting started with the wheel bearing repair and ordering parts from an online retailer / local parts store, now would be an ideal time to ask yourself if you also need to do your brakes. Removing your rotors requires removing your wheel bearing / hub assembly. For this reason I highly suggest you do your brakes at the same time. I cover both repairs in this guide.
| Please work safe. Never be under a vehicle only being supported by a jack. Ensure it is fully supported. Serious injury and death can occur if the vehicle falls |
WHAT DO I NEED TO FIX MY WHEEL BEARING?
Here is a quick parts and tool list that you will require to fix your wheel bearings on your 2003-2012 1st gen Chevy Colorado along with affiliate links to parts/tools:
- Jack / Jack Stands
- Wheel Chocks for safety
- 1/2″ Torque wrench
- Impact Wrench (not necessary but highly recommended if you have 600 ft lbs +)
- Basic socket set that includes sockets, extensions and swivels
- Wire tie or something you can use to suspend the brake calipers when removed
- 36mm deep axle nut socket (this will be a specialty socket)
- 1/2″ Breaker bar (may or may not be used if you have an impact)
- 7.25” long 2×4 piece of wood
- 4.5” long 2×4 piece of wood
- Brake Cleaner
- Wheel Bearing / Hub assembly (I recommend buying one with a new ABS sensor already installed)
EXTRA PARTS NEEDED TO CHANGE YOUR BRAKES
In addition to the list above, you will need:
- Brake pads
- Rotors
- Brake Caliper Grease (I recommend a high quality grease like CRC)
- Brake Caliper Spreader
EXTRA PARTS NEEDED TO REPLACE YOUR DIFFERENTIAL SEAL
In addition to the parts listed for repairing a wheel bearing (minus the new wheel bearing) you will require:
- Differential seal
- Slide hammer / pry bar
- Differential fluid (xx quarts)
- Seal driver set or a socket just smaller than your new seal
- Ball joint / Tie Rod Separator (this is my favorite as it doesn’t damage the boots!)
LIFT THE CHEVY COLORADO & REMOVE THE WHEELS
Lift the truck into the air and place it safely on Jack stands chalking the rear tires so that the truck cannot go anywhere. Once the truck is in the air you can use your impact to remove the lug nuts / wheel.
REMOVE THE BRAKE CALIPER & CALIPER BRACKET
If you look at the back side of the wheel you will find (2) 13mm caliper bolts that hold the caliper to the caliper bracket. Remove these two bolts and slide your caliper off. You can use tie wire to tie the calipers up so that they do not put any weight on the brake hose, or you can place them on something like old paint cans like I did. Whatever you do, don’t let them pull on the brake hose.
With the Caliper out of the way you will see (2) 13/16” bolts that hold the caliper bracket to the spindle. Remove these bolts in order to slide off the caliper mounting bracket that also holds the brake pads.


REMOVE THE CHEVY COLORADO HUB & AXLE SHAFT BOLTS
Use your impact and the 36mm socket to remove the axle shaft bolt. Once you have removed the bolt, I like to put it back on the axle threads 4-5 turns just to keep wheel hub from flying off and tearing out your abs sensor wire.

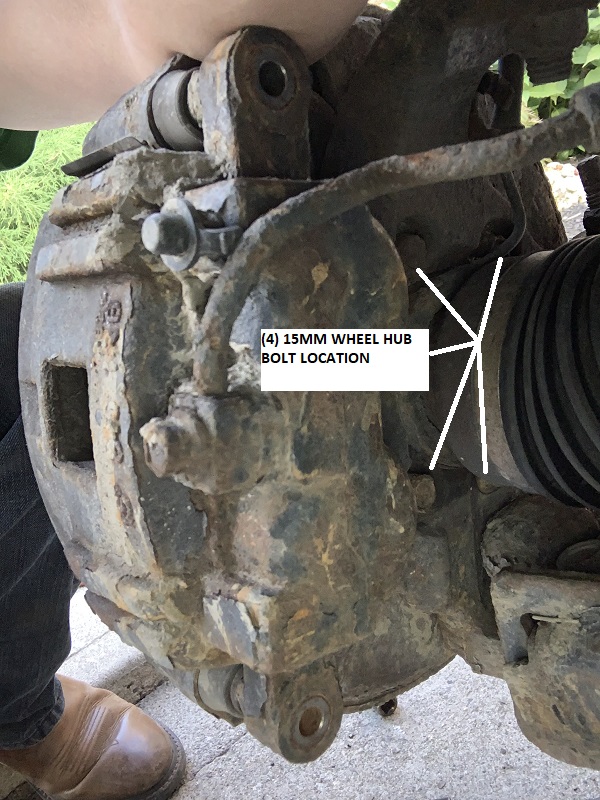
UNBOLT YOUR GMC CANYON / CHEVY COLORADO WHEEL HUB
Look behind the rotor / wheel hub to locate the (4) 15mm hub bolts. To make removing these bolts easier you can crank the steering wheel all the way to the left to get 2 of the bolts and all the way to the right to get the other two bolts. I have read many people have required a swivel extension to get the bottom bolts. I did not require one. I was able to easily get all 4 bolts with a short socket and 3” extension. It may have helped that I had a jack stand under my front A arm that put my control arm sitting 11.5” off the ground.
UNCLIP YOUR ABS WIRE AND FISH IT DOWN TO THE SPINDLE
Locate the ABS wire that goes into the back of your wheel hub. Follow the line up and begin unclipping any bracket that holds that wire in place. You will follow this wire up to roughly the upper portion of the shock tower where you will find a harness connection. Unclip the harness and feed your wire down. You want the entire wire fed all the way down and sitting loose with slack by the spindle. If you miss this step, when you pop the wheel bearing you’ll break your ABS wire.
UNBOLT THE BRAKE ROTOR BOLTS
Some do this step after they have removed the wheel hub from the vehicle, I do this step now. What this allows me to do is use the rotor as a bit of a slide hammer against the back of the wheel hub after I have used the blocks of wood method below. When the wheel hub is ¾’s of the way out, having the ability to smack the back of the hub with the rotor is usually just enough force to break it free. On one wheel the hub needed a few taps from the brake rotor to assist the hub out of the spindle, on the other wheel bearing I did not.

USE BLOCKS OF WOOD TO BREAK LOOSE YOUR WHEEL HUB
Rather than abuse the truck with a sledgehammer, the 7.5” and 4.5” long blocks of 2×4 wood make this job a breeze. I started with placing the 7.5” block of wood against the bottom of my shock and wedged against the back of my caliper. Look closely at the two photos below for wood placement. Do not put the block of wood against the body of the shock or you risk damaging your shock. If you place the wood against the mounting eyelet you should be fine.
With the block of wood in place, start your Chevy Colorado up and turn the wheel so that the rotor presses as far as it can against the block of wood. Once you have turned the wheel all the way to one side, repeat this process with the 4.5” piece of wood turning the wheel all the way to the opposite side.
Within about 2 wheel turns in each direction your wheel bearing should be 95%-100% popped out. Any little bit that it has hung up you can use the rotor to smack it out.


REMOVING FRONT WHEEL BEARING FROM CHEVY COLORADO
You can now remove the axle nut all the way and guide your wheel bearing hub with one hand while helping feed your ABS wire with the other. When you get the wheel bearing out far enough you can place it wheel stud down on the ground and finish feeding your wire through the spindle. When you get to the harness connection simply push on the axle half shaft to make it retract an inch or so and you’ll be able to squeeze the harness connection out.
Make sure when you place your wheel bearing hub down it is resting on the wheel studs and not the ABS sensor. If you rest it on the sensor you will damage it.
If you are simply replacing the wheel bearing hub and or
brakes, skip down to “reinstalling the wheel hub and rotors”, if you need to
replace your differential seals continue in sequential order below.
REMOVING THE FRONT DIFFERENTIAL SEAL
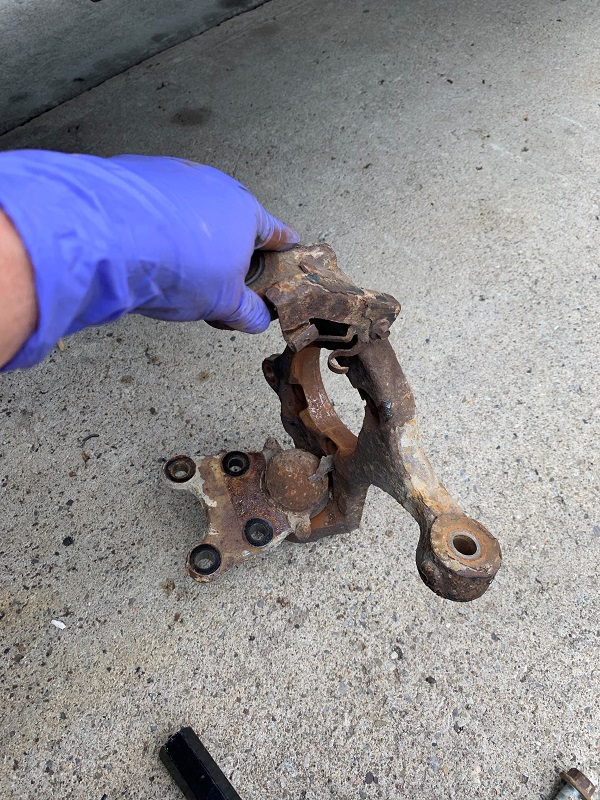
To access the front differential seals you will need to remove the half shafts. To do this you must first undo the upper ball joint and tie rod. To preserve my tie rod and ball joint boots so that I could re-use them, I used this style ball joint removal tool and method. With the ball joints and tie rod removed you can remove the spindle to clear the half shaft.
Take a long pry bar and place it at the end of the half shaft as shown and wiggle it to get the prybar to release. These half shafts are held in with only a retaining clip that will pop out of the groove when you pull the half shaft. DO NOT pull the half shaft by anything other than the end of boot closest to your prybar or you may separate the joint inside. The shaft should slide off with a little massaging.
With the half shaft out of the way you’ll see your seal. Careful you don’t mar the inside edge where the seal sits when removing the seal. The easiest way I found to remove the seal was to put my pry bar in behind the seal like pictured below and give the prybar a few taps with my hammer.
Clean the area up with a rag and some brake cleaner.


INSTALLING THE FRONT DIFFERENTIAL SEAL
It is best to apply some silicone grease to the outer edge of the seal. Make sure that the black rubber is facing outwards (it should say airside on it). You can now take a socket that is just slightly smaller than the seal or use a seal installer to tap it into place. You need to insure that the seal goes in straight so that it does not leak. I do this by giving it a tap or two and then checking the seal to insure it is not cockeyed.
HOW TO CHECK IF YOUR CHEVY COLORADO HALF SHAFTS ARE BAD
Now would be a great time to double check if your half shafts have any play in them and require replacing before you reinstall them. With the half shaft out, twist them from both ends and see if there is any slack or play in the joints. If there is no play they are still good!
REINSTALL THE HALF SHAFTS
Apply some gear oil to your half shafts splines before you slide them back in. I used some 75W-90 Amsoil gear oil that I ordered as I was also going to flush my differential after this job. The bags they have make it super easy to fill the diff given the awkward angles.
REINSTALL THE UPPER BALL JOINT AND TIE ROD ENDS
Put the spindle back in place now that your half shaft is installed. Line up your tie rod and upper ball joint.
I found the easiest way to get everything to come together is by placing a jack underneath my spindle and lifting my control arm slowly while guiding it with my hand. Once the stud goes through the hole you can put your nut on it and begin to wrench it down.
Many folks have suggested to use a crowfoot or box wrench while simultaneously using an allen wrench to stop the stud from spinning as you tighten your nut down. You don’t need to fuss with any of those. If you notice in the photo below the stud for your tie rod and ball joint are tapered.

This means, the more you tighten the bolt the more the stud will drive itself into the spindle and prevent itself from turning. What I do is jack up on the control arm as much as I can to drive that stud as far into the spindle as possible. I then lightly whack the back of the ball joint with a hammer to help it seat. This allows me to then take my torque wrench and tighten the bolts up to spec with no fuss.
The upper ball joints on my truck were 74ft lbs. The tie rod was 33ft lbs plus a 95* turn. Please double check the specs for your year/model truck in case they are different.
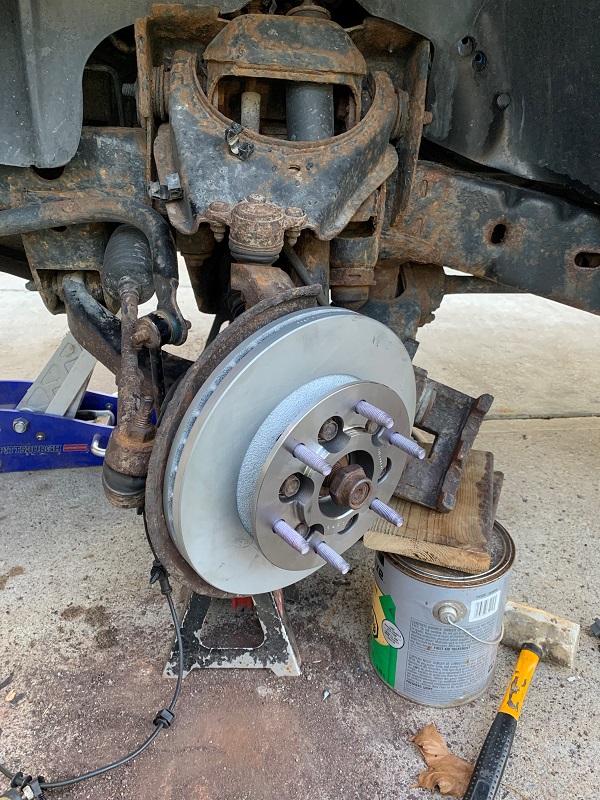
REINSTALLING THE WHEEL HUB AND ROTORS
Before you do anything, take your new wheel hub and bolt your rotor to it. Be careful not to damage the ABS sensor. I find it is easiest to place the hub in my lap and bolt on the brake rotor. If you don’t do this step first I can almost guarantee you will forget to bolt your rotors on before you slide the wheel hub in place! Ask me how I know… LOL
Before I install my wheel hub and rotors into the spindle I like to clean the pocket that they sit in. This is an optional step. That being said, I highly recommended that you take some sandpaper and run it around the opening to clear away any rust/corrosion.
Take some silicone grease (I used brake caliper grease) and run it around the spindle pocket that your wheel hub sits in. This is going to help you be able to slide your wheel hub into place.
Now, take a moment to push on your half shaft to get it to compress and feed your ABS wire all the way in between the half shaft and the spindle. When you have installed the wire you can lift your wheel hub / brake rotor assembly onto the half shaft and attempt to slide it into the spindle. I did this by myself, but a helping hand is definitely beneficial for this step!
I angled the bottom of the wheel hub so that it was in the pocket first on an angle and then placed a block of wood on the top part of the hub/rotor and gave it a few good whacks and she went together nicely.
Put your axle nut on loosely.
Note in the below photo that you need to finish feeding that wire all the way through the spindle. My photo shows it 80% of the way in.

REINSTALL THE 4 BOLTS HOLDING THE WHEEL HUB
Remember the 4 bolts your removed from the back of the wheel hub? Those will be bolted back on the same way you took them off.
REINSTALL THE CALIPER BOLTS
Reinstall your caliper bracket and bolts and torque them to spec. Since you have your caliper off and apart, I recommend greasing your guide pins with silicone brake grease.
If you are installing new brake pads, take note of the way the old ones were installed. The metal shims that sit in the caliper bracket can only go on one way. If you install them backwards you will have a loud screeching noise from the thin metal touching your rotor the moment you start to drive
TORQUE DOWN YOUR AXLE NUT
With your brakes now reinstalled, have someone sit in the car and hold the brakes while you torque your axle nut to spec. This is a requirement to keep the wheel bearing from rotating.
PLUG IN THE ABS HARNESS
Plug in the ABS harness and tidy up the wire ensuring that it is not touching anything that can melt or pinch it. I ran it all back to the factory wire holders and secured it back down like GM did it.
REINSTALL YOUR WHEELS AND TEST DRIVE
Make sure everything is torqued to spec, reinstall your wheels and go for a test drive!

If you found this guide useful, don’t forget to share it!
Other articles you may be interested in:
minor car scratch repair | deep scratch and key marks repair guide | frame rust repair guide | product reviews | buffing & polishing pad types