
Are you trying to determine how much it will cost to fix a keyed car? Or are you trying to figure out how you repair a car that has been keyed? Everyday I get emails about what the best “scratch remover” is for everything from paint chip repair, to small clear coat scratches and even scuff and swirl mark repairs. People have either read my guide below on how to touch up their deep car scratches or they have followed my guide on how to buff out minor scratches on a car.
I had the unfortunate mishap of someone keying my car pretty bad. I used some basic tools and auto paint repair products and the result was spectacular and made the paint look almost new.
Obviously, you are here because you have damaged your cars paint and if it was from being keyed it is probably safe to say that you are not in jail and/or a court house suing for damages at this point. If you caught the person you may have just hired a Cincinnati criminal lawyer to try your case and as a result were found acquitted of the charges from your encounter. Or, like most of us, you are looking to just cut your loss and repair the scratch yourself.
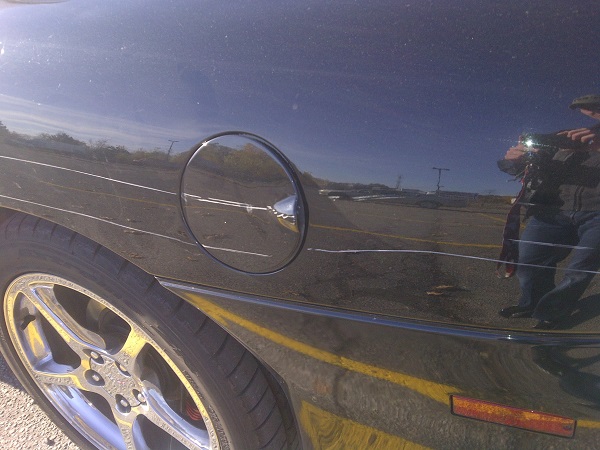
To give you a quick idea of the key scratch on my car, the picture below show my damage. The scratch spanned bumper to bumper. Here is how you touch up and buff out scratches on your car.

CAR SCRATCH REMOVAL MATERIALS NEEDED
Give this guide a complete read through in its entirety at least once before beginning your vehicle scratch repair. I also recommend you bookmark it on your phone for quick reference.
I have provided an affiliate link to the products I personally used to get my results. I appreciate the support if you buy from these links. However, you do not have to use these products in your car scratch removal efforts. That being said,my personal results are with the following:
 | Touch up paint matching the colour of your car. Spray can is the best way. Do Not buy the touch-up pens. |
| Primer – self etching (only if scratch is down to bare metal) |
| Clear Coat (spray can) |
 | Cheese Cloth |
 | Rubbing Compound |
 | Polishing Compound |
 | Microfiber cloth |
 | Polish/wax applicator pads |
 | Quixx Scratch repair |
 | Painters Tape |
 | Newspaper |
 | Polish (different from polishing compound) |
 | Caranuba wax (Get the 16oz liquid, it’s easier to work with) |
CLEAN THE SCRATCHED AREA

Get all the dirt and grime off by washing your car so that you can see the extent of the damage more clearly. This often uncovers additional damaged surface area. It can also serve to subsequently “shrink” the scratch as dirt will make the damage look worse than what it really is.
ASSES THE COSMETIC DAMAGE
Is it a minor or major scratch? Take your finger nail and feel it. Does your finger nail get caught on the edges of the scratch or does it still feel smooth? If you can feel the scratch with your nail, you are through the clear coat and into the paint. This is considered a deep scratch. Continue to follow the guide below to help restore the looks of your car. If the scratch is smooth then refer to our guide on how to repair and buff out minor scratches
APPLY RUBBING COMPOUND
When repairing any scratch on your car / truck you want to avoid going to the most aggressive method first. This is so that you remove only as much clear coat as absolutely necessary both on the scratch itself and surrounding areas.
Deep scratches create somewhat of an edge. The best way to smooth that edge is to use a scratch remover called “rubbing compound.” The video below shows how to apply rubbing compound. If your scratch disappears entirely after this step, then skip the rest of this guide and continue to follow our instructions for minor scratch repair.
1) Apply rubbing compound to a dampened cloth (cheese cloth works best). I recommend doing this step by hand. Begin applying compound to the scratch in a up down motion against the direction of the scratch. Work a small section at a time (roughly 3.5″ wide). Apply moderate pressure (about the same amount as when you dry your car after washing it).
2) Take a separate clean cloth and wipe away the rubbing compound. You’ll notice the area you worked has become “dull”. You can repeat this step if it appears the scratch has almost gone away. If not, don’t worry about the dullness on your paint section at this time. If the scratch is still on your car keep following the guide below. You may notice at this time the scratch looks a tad bit skinnier / smaller.
3) Rewash the section you just worked on with car wash soap and water . This step is EXTREMELY important. MAKE SURE you get ALL the rubbing compound OUT of the scratch. This is a deep scratch which means content / residue can hide in the crevice. This area MUST be spotless. I recommend using a fine bristle brush to make sure it is clean. A toothbrush can work as well.
TAPE THE SCRATCH
This is the hardest part since many scratches are not in a straight line. This step requires attention to detail and patience when taping the area.
Take painters tape and very carefully tape the outline of the scratch so that absolutely nothing is showing but the scratch itself. I recommend doing the bottom of the scratch first (entirely) and then taping the top to match (or vice-versa). Take your time. If you cover any part of the scratch it will not get painted. Similarly, if you leave a painted portion that is not taped beside the scratch it will stand out and show.
Be very diligent taping the section off. Let me make myself extremely clear here, when you look in between your two lines of painters tape, you should not see anything other than the white from the scratch. If you do, remove that section of tape and redo it until it is perfect. A mess up here will destroy your results. A good tape job makes a huge difference.
TAPING MULTIPLE SCRATCHES
If you have multiple scratches to remove directly on top of one another (in other words they are touching each other in some fashion), unfortunately this is going to take you a couple of weeks to repair. You can’t tape over fresh paint until it has had time to cure for a week.
PROTECT YOUR SURROUNDING PAINT

Take some newspaper and tape it to the remaining good paint in the immediate vicinity to protect the rest of the good paint. You want room to over-spray your automotive touch-up paint spray. This will allow you to perform clean sweeping motions uninterrupted later. You don’t want to get over spray either from the touch-up paint or the clear coat on the rest of the paint.
Note that in the above picture I was using touch up paint with a brush vs a spray can. Having done this repair on more than one vehicle (not all key marks), the spray can is the easiest!
CLEAN THE AREA TO BE PAINTED WITH ALCOHOL
Take an alcohol pad and wipe the scratch one last time. I can’t stress how important it is to have this area clean. If it’s not clean, your automotive touch up paint will not adhere properly and will flake off later.
APPLY AUTOMOTIVE TOUCH UP PAINT
If you are down to bare metal, apply a single coat of PF 654 self etching primer before your paint to insure good adhesion. If you are not down to bare metal than primer is not needed. Don’t worry if your first pass misses a few areas of your scratch, you’ll get it in your second pass with the spray can.
It is important that you follow the directions of your touch up paint. Most instructions tell you to apply thin coats within 10 minutes of each other. Take your time and apply 3-4 coats of paint. Thin coats are better than thick ones. On your last coat you can go a bit thicker, but thin and even coats are best.
This process is filling in the deep scratch to build it back up to the height of the original paint.

APPLY AUTOMOTIVE CLEAR COAT
Clear coat follows the same rules as the touch up paint above. Follow the instructions on the can with regards to how quickly to apply coats. Some products differ from others. Apply 3 even thin coats to the scratch. Apply this in nice full sweeps across the scratch the same way you did the paint.
Note: that with the clear-coat it may look as if when you swept across the scratch nothing applied, it did. Remember this stuff is clear. Clear means you won’t see it.
REMOVE YOUR TAPE IMMEDIATELY
Immediately after you have applied your final coat of clear-coat, begin slowly and carefully pulling the tape off. Because you have painted such a thin line, you don’t want it to dry on the tape and possibly be pulled off later when you go to remove the tape.
Note: At this point the scratch will look awful. The paint and clear-coat will have created a slight raised bump. Don’t worry, this is what is suppose to happen, just don’t touch it, let it be.
WAIT 7 DAYS FOR PAINT TO CURE

Do you have to wait 7 days? Yes – this is how long it take the paint / clear coat to fully cure. During this time you can drive around, but avoid washing the car. Although the paint/clear coat may be “dry” to the touch after a few hours it is still chemically reacting.
APPLY RUBBING COMPOUND
Now that 7 days has passed, you are back to using the rubbing compound as you did in the first few steps above in the “apply rubbing compound” part of this guide.
APPLY POLISHING COMPOUND
Polishing compound is different than car polish. It fixes the scratches on your car left by scratch removers such as rubbing compound. Many people get polishing compound and polish confused. If you aren’t sure what car polish compound is, visit the link we posted in the materials section up top. Apply the polishing compound the exact same way that you would the rubbing compound in the step above.
CAR SCRATCH REMOVER
Crack out that package of Quixx Scratch Remover. This stuff is phenomenal and one of the key reasons that this comes out so nicely. Follow their instructions.
Start with the piece of sandpaper provided. Wet it and begin working on one side of what was your deep scratch. The only pressure you should use here is enough to hold the sandpaper on the surface of the paint, i.e very light. Keep it flat with your two fingers and rub it in a circular motion on the scratch. Do about a 1 inch section at a time.
**Note that you can only sand once for a maximum of 15 seconds. Do not do more than this as you risk destroying your surrounding clear-coat. I sanded my scratch for only about 10 seconds working an inch section at a time as I worked all the way down the entire length of the scratch. Make sure that you keep the sandpaper wet or it will not work/slide nicely. Also, don’t go buy your own sandpaper either, this isn’t your run of the mill sandpaper at your local store. Use what is provided in the package.
APPLY TUBE 1 OF QUIXX SCRATCH REMOVER
Apply tube 1 (as labelled) on the cloth that they give you. You need to apply a lot of pressure in this step. Make sure you are doing this on a day when you haven’t just come from the gym with jello arms. I worked about a 4 inch section at a time. Work this paste into the scratch for a minimum of 2 minutes per section. Be sure to wipe off any excess when finished.
APPLY TUBE 2 OF QUIXX SCRATCH REMOVER
Apply tube 2 (as labelled) on the other cloth they give you (DO NOT use the same cloth you used for tube 1 with tube 2). Same thing applies as with tube 1, work a 4inch section with A LOT of pressure for a minimum of 2 minutes per section before moving on.
APPLY CAR POLISH

Apply polish (not polishing compound!!) to the scratch. Work it in a small section at a time. For this step you can use a buffer if you are familiar with the operations of it. Good polishing pad selection can help your outcome and cut down on time. If you have not used a polisher before just continue to use your hand. Follow the instructions on your polish bottle. My instructions stated to let the polish haze up and then wipe it off. I applied 2 coats of polish.
APPLY CAR WAX

Apply your car wax the same way you applied your polish. I like the caranuba wax. I find it to be high quality, durable and it leaves a great shine. Just like when I applied the polish, I recommend putting on two coats of wax. Again, a polisher / buffer is optional here.
SUCCESSFUL CAR SCRATCH REPAIR
Step back and enjoy your hard work. You no longer have any deep scratches on your car. This is how my deep scratches came out. Note that on the rear panel you can still see the scratches on the fuel door. This is because I did not address/paint those at this time.


SCRATCH REPAIR FREQUENTLY ASKED QUESTIONS:
Q: Do I need a buffer / polisher to get my scratches out?
A: Not at all, our guide is geared towards those that don’t have fancy polishers. My personal repair was without a polisher. However buffer / polishers can be used after the repair to further bring out the shine in your car.
Q: I have a picture of my car scratch, can you look at it?
A: Absolutely, visit our contact us page and send us an email.
Q: What is the best scratch remover to fix the scratches on my car?
A: There is no magical solution. The best results are generated by proper process as opposed to a magical product. If you follow the guide above you should be able to repair most scratches on your vehicle. If in doubt contact us
Q: How can I fix my car scratch at home in the driveway? Does your guide require going to a shop or using a garage?
A: The guide above is meant to help you repair you car scratch on your bumper, door, fenders or other parts of your vehicle at home in the driveway. While being able to work in a garage makes the task easier as you do not have to worry about daylight or weather conditions, working in the driveway can produce great results. In fact, our guide was done in the driveway. If you still are not sure, you can reach out and contact us
Q: Can I use nail polish remover to fix my scratch? / Does WD-40 fix car scratches?
A: We cannot vouch for these methods, however nail polish remover is similar to a paint thinner and WD-40 is a lubricant. We don’t recommend using either product on your paint surface.
Q: Is it best to use a paint pen / scratch remover pen or spray paint to fix my cars scratch?
A: I always recommend using spray paint in the process below. Spray cans allow for uniform coverage and light coats to be applied. Paint pens make it very difficult to control the amount of paint being applied to your scratch while remaining uniform so that it can be blended in.
Q: How do I know if the scratch is through the clear coat or the paint?
A: The rule of thumb is if you can spray water on your car and the scratch disappears, it is through the clear only. If you can see metal/fiberglass in the scratch it is entirely through the paint and clear coat.
Q: Do I need to apply bondo to repair my scratch?
A: No, not unless you are missing chunks of metal or fiberglass on your car. If this is the case you may want to visit a body shop for a quote and to see if there is other damage as a result. Typically this will not be the case unless you were in an accident.
Q: Should I put an insurance claim in and have them fix my car?
A: This is certainly an option if you do not feel confident in completing the repair yourself. Visit our article “should I make an insurance claim?” to find out if it makes financial sense for you to go this route. We explain how to determine how much it will cost you in insurance premiums so that you can make an educated choice on your repair.
SHARE IT!
If this guide helped you- share it! Put it on Facebook, twitter, pin it, reddit, etc. Post it on your car forums- I went through a bad experience having my car keyed, I appreciate knowing I helped others when the too have had a bad day!
To subscribe to our posts, enter your email into the subscription box to the right if you are on a desktop computer and at the bottom of the page if you are on mobile. You can also follow us on Instagram @highperformancejunkies
Also take a moment and check out some of our other great articles such as:
How to wax and polish your car | rust prevention and repair | painting brake calipers | plasti dipping a Jeep grille | minor scratch repair
Hi there, and thank you very much for all those explanations. I’ve got 3 really really deep scratches, down to the bare metal. I wonder if I should: 1, use a filler (bondo), then a primer, or 2, use a filler primer? Another question, will the rubbing compound be enough at the beginning, should’nt I use sandpaper? Many thanks.
Hi, thanks for the guide ! I have the same questions on the recommended steps to follow for 2 some deep dents on a white car. Kind regards, Y
Replied in an email!
Just curious: for a very small nick (about 1-2 mm diameter) that goes to bare metal, would you recommend just getting touch-up paint + a clear coat for it? Is there any need for the primer or masking off of the nick that you did above for the deep gashes?
Emailed you
I have a similar issue. Can you share it with me too?
Hi, there, just found your site and very interested in following your steps to repair a light scratch on my car. What makes it more complicated is that the paint is tri-coat. Could you check some pics that I took and let me know if I should follow your approach? Thank you so much.
Is it possible for me to skip the Quixx Kit part? And also is using putty a good choice?
I would not advise skipping the Quixx Kit portion no…