
The newest addition to my fleet of vehicles is a 2018 Chevy Colorado I4. I trusted that Chevy was going to properly safety it, but after 7,500 miles I had no rear brake pads left and my rear brakes were flinging metal shards across my rim. So the result became making this guide on how you replace the rear brakes on a 2015+ Chevy Colorado / GMC Canyon.
Tools Needed:
- Basic Socket Set
- Torque Wrench
- Breaker Bar / Impact Gun
- Caliper Compressor
- Brake Grease
- Anti Seize
- Jack
- Jack Stands
- Wheel chocks to prevent the truck from rolling
- Brake Cleaner
- Steel wire or a little bench
- Torx bits
Colorado Brake Torque Specs
- Brake Caliper Guide (slider) Pin Bolts – 23lb ft
- Brake Caliper Bracket Bolts – 89 lb ft
- Lugnuts – 103lb ft
Working Safely
Never ever get under a vehicle supported by just a jack. Work on flat ground. Get your Jack, lift-up by the frame and put your jack stand under the back axles. Put a set of wheel chocks up on either side of your front tires to prevent the truck from rolling and possibly dislodging the jack stands. Remove both rear tires. As a safety measure I like to put the tires I took off under the vehicle beside my jack stands. This way if the truck does fall, I may lose my rim, but I will have a better chance of keeping my limbs.
Remove the Rear Brake Calipers
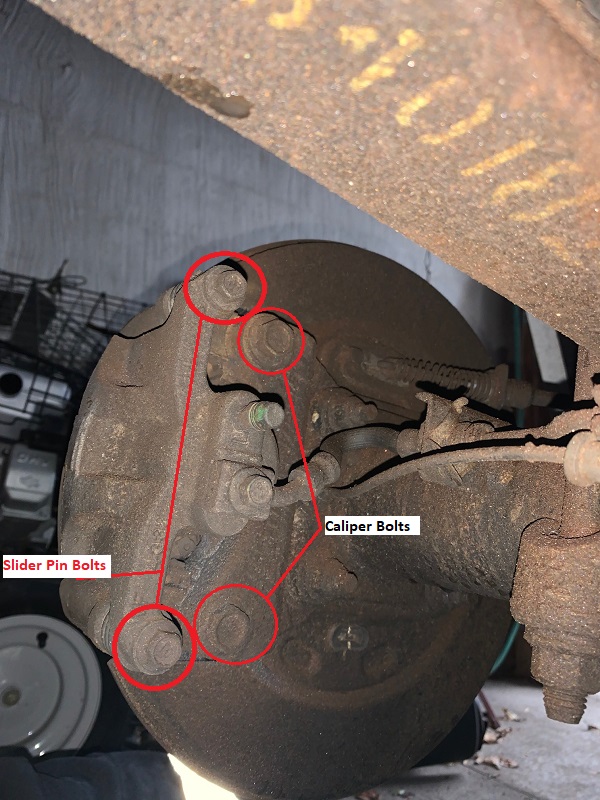
This part is straight forward. There are 2 caliper pin bolts on the back side of the rotor. Unbolt these and it will allow you to take the front bracket off and place it out of the way. The next two bolts you see pictured below are for the caliper. Remove those two bolts and the caliper will come free. I typically place a small bench behind my rotor that I can rest my caliper on so that it does not stretch the brake line. You can tie yours up if it is easier for you.
Remove the Rear Brake Rotors
Next is to remove the bolt holding the rotor on. This is a torx bolt. Once this has been removed the rotor should be able to just slide off. It may need some minor massaging from a mallet if it is stuck on there.
With the rotor off, I like to clean up any break dust that gets captured behind my rotor. I typically spray the area with brake cleaner. Be careful not to breath any of the dust in.

Installing New Brake Pads / Rotors
Before installing your new brake rotor, I like to put some anti-seize on the face of the axle flange. This helps prevent the rotor from being stuck on by corrosion later. Next, install the rotor and hand tighten the torx bolt to hold it in place. Spray the rotor down with brake cleaner and wipe it with a paper towel or rag.
Grab your caliper and note which way the pads are installed. Pull the old pads out. Use a caliper clamp to push the piston of the caliper all the way in. Then, put a high quality silicone grease on the backs of the pads that sit against the piston and bracket to prevent any squeaks or chatter. Grease your slider pins up. Use the high quality silicone grease that you used on the back of the pads, and then slide them back into the boots. To do this I put the bracket and caliper together and then put it on the truck to be bolted on. The Caliper pin bolts should be torqued to 23lb ft and the brake Caliper bracket bolts torqued to 89 lb ft.
After this you can bolt your wheels back on and torque the lug nuts in a criss-cross pattern to 103ft lbs and you are done!

For other write-ups, check out our how to section